Dual arm pik/place tutorial
Note
This tutorial has only been tested with ROS Indigo. The source code is not public yet so only registered members can follow this tutorial.
Pre-requisites
- You have a catkin workspace
- You have followed the previous tutorial on how to setup your robot .
The dual arm pick and place actions are defined in a MoveIt! capability where two action servers wait to process dual arm pick or place requests to plan/execute the motions.
In this example, we will run through the C++ code required to pick an object with both arms and place it at a desired location using both arms and the torso.
The demo
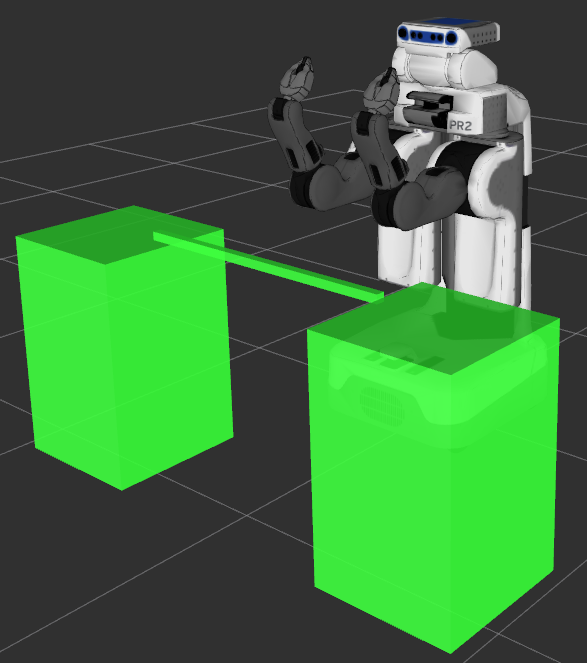
In this tutorial, the plannig scene will be set with two colums and a bar on them. Then the pr2 robot will grasp the bar with the left arm first and the right arm after. Finally the bar will be place to specific locations by using both arms.
General setup
Through this tutorial, only the arms and their end effector will be used. So instantiate these groups.
moveit::planning_interface::MoveGroup r_arm("right_arm");
moveit::planning_interface::MoveGroup l_arm("left_arm");
moveit::planning_interface::MoveGroup r_eef("right_gripper");
moveit_dual_arm::MoveGroupX arms("arms");
moveit_dual_arm::MoveGroupX arms_torso("arms_torso");
The joint of the grippers which will be controlled and their specific values
const std::string l_eef_jnt = "l_gripper_l_finger_joint";
const std::string r_eef_jnt = "r_gripper_l_finger_joint";
const double eef_opened_max = 0.6;
const double eef_closed_bar = 0.2;
The world frame and the target frame which will be used for the dual arm place action
const std::string world_frame = "odom_combined";
const std::string target_link = "l_gripper_tool_frame";
const std::string torso_jnt_name = "torso_lift_joint";
const double max_torso_value = 0.33;
This variable will hold the MoveIt results of any actions performed (success or type of failure)
moveit_msgs::MoveItErrorCodes e;
Wait the user to press enter to continue
waitUser("To set the planning scene");
Setting the planning scene
if( ! loadScene(nh, world_frame) )
{
    ROS_ERROR_STREAM("Unable to load the planning scene. Abort demo!");
    return -1;
}
const std::string obj = obj_bar;
Wait the user to press enter to continue
waitUser("To pick the object with the left arm");
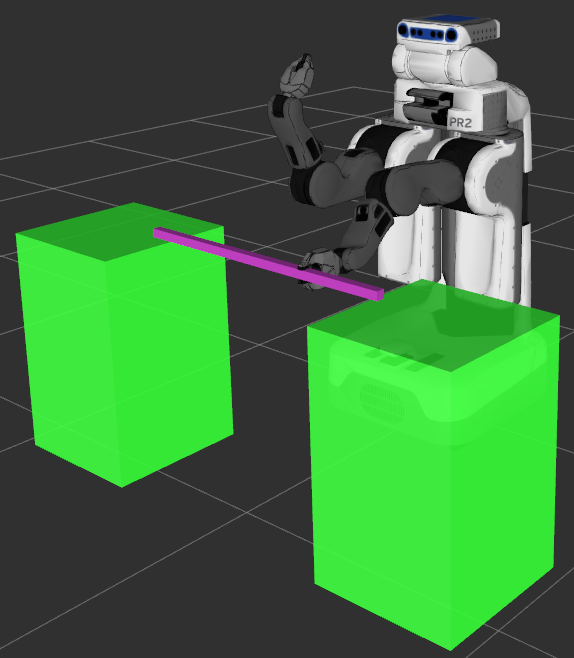
Pick the bar with the left arm
To pick the bar object, the MoveIt! pick action is used. This action allow to perform the pick task with a lot of options (apporach, retreat, ...) that need to be defined in a Grasp message.
moveit_msgs::Grasp grasp;
geometry_msgs::Pose pose;
{
Initialize a Grasp with a name and a pose This pose defines the desired position & orientation of the end effector link of the left arm with respect to the object.
setPosePosition(pose, -0.17, 0.2, 0.);
setPoseOrientation(pose, 0.707, 0., 0., 0.707);
setGraspPose(grasp, obj, pose);
Set the approach translation in the frame of the object
setGripperTranslation(grasp.pre_grasp_approach, obj, 0.15, 0.1, 1, 0, 0);
Set the state of the gripper to an open posture for the approach toward the bar object
setToJointTrajectory(grasp.pre_grasp_posture, "0", l_eef_jnt, eef_opened_max);
Set the state of the gripper to a close posture to grasp the object
setToJointTrajectory(grasp.grasp_posture, "0", l_eef_jnt, eef_closed_bar);
Then call the pick function to perform the desired grasp and print the type of error in case of failure
    e = l_arm.pick(obj, grasp);
    if( e.val != moveit_msgs::MoveItErrorCodes::SUCCESS)
    {
        ROS_ERROR_STREAM("Pick "<<obj<<" with "<<l_arm.getName()<<" failed with MoveitErrorCode = "<< e.val<<". Exit!");
        return -1;
    }
}
Wait the user to press enter to continue
waitUser("To pick the object with the right arm");
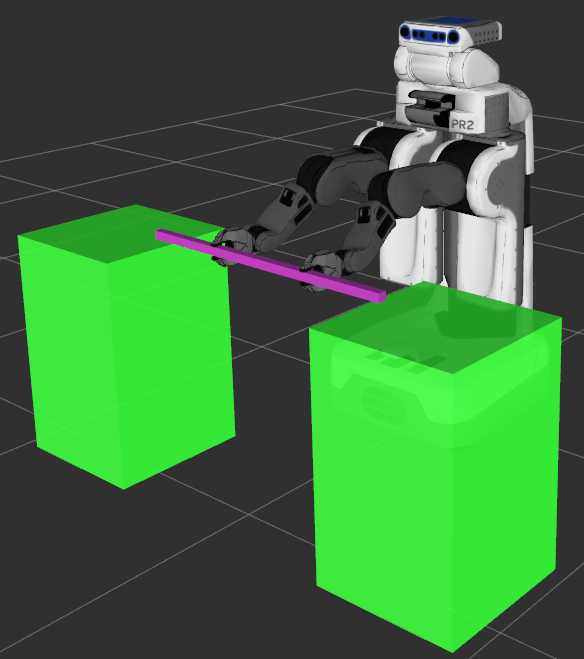
Pick the bar with the right arm
Set the grasp Use the previous Grasp
grasp.id = "gr_" + obj;
grasp.grasp_pose.pose.position.y *= -1.;
Set the approach translation The approach is the same as before so no need to change it
Set the state of the gripper to an open posture for the approach toward the bar object
setToJointTrajectory(grasp.pre_grasp_posture, "0", r_eef_jnt, eef_opened_max);
Set the state of the gripper to a close posture to grasp the object
setToJointTrajectory(grasp.grasp_posture, "0", r_eef_jnt, eef_closed_bar);
The allowed_touch_object of a Grasp is not used. If the pick action is allowed to touch objects, then these objects can be specified later
grasp.allowed_touch_objects;
Add the previous Grasp to a vector of Grasp to match the dedicated field of DualArmPickupGoal.
std::vector<moveit_msgs::Grasp> grasps(1, grasp);
Set parameters for the dual arm motion planning
arms.setPlanningTime(5.);
arms.setPlannerId("RRTConnectkConfigDefault");
arms.setDualArmPlanOnly(false);
arms.setDualArmReplan(true);
arms.setDualArmReplanAttempts(3);
arms.setDualArmReplanDelay(10);
In case the object is on a support MoveIt! can see a collision. By putting setDualArmAllowGrippersSupportCollision to true, the collision checker will not consider the collision.
arms.setSupportSurfaceName(two_col_support);
arms.setDualArmAllowGrippersSupportCollision(false);
Here we can defined the list of links from the robot which are allowed to touched the object. By default, the links of the grippers will be added.
arms.setDualArmAttachedObjectsTouchLinks(std::vector<std::string>());
To store the trajectories in case of success
std::vector<moveit_msgs::RobotTrajectory> trajectories;

e = arms.dual_arm_pick(obj, std::vector<moveit_msgs::Grasp>(1, grasp), trajectories);
Wait the user to press enter to continue
waitUser("To place the object with both arms");
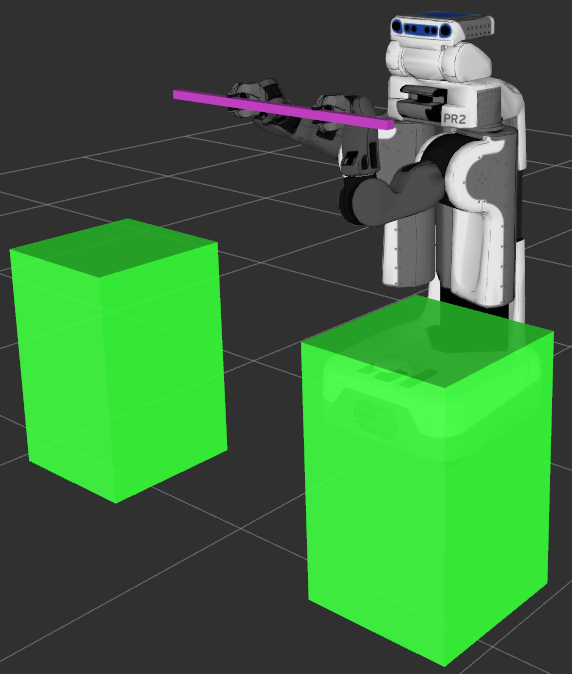
Place the bar with both arms without the torso
It is important to use the dual arm planner configuration defined in ompl_planning.yaml file.
arms.setPlannerId("RRTConnectkConfigDualArm");
The last field of the goal_place ‘place_locations’ holds a vector of DualArmPlaceLocation message. This message holds information about the dual arm place motion (the start, approach and retreat translations, the posture of the grippers).
dual_arm_msgs::DualArmPlaceLocation loc;
Define the DualArmPlaceLocation with a name and specified the name of the two end effector links
loc.id = "loc_da_1" + obj;
loc.first_eef_link = r_arm.getLinkNames().back();
loc.second_eef_link = l_arm.getLinkNames().back();
Set the post place posture and retreat for the left gripper. For now it is not used in this demo
bool left_retreat = false;
if (left_retreat)
{
    setToJointTrajectory(loc.second_post_place_posture, "0", l_eef_jnt, eef_opened_max);
    setGripperTranslation(loc.second_post_place_retreat, obj, 0.15, 0.1, -1., 0., 0.);
}
Set the post place posture and retreat for the right gripper. For now it is not used in this demo
bool right_retreat = false;
if (right_retreat)
{}
Specifiy the desired value of the torso for the goal. For this first dual arm place leave it empty. We are not using the torso.
loc.user_goal_constr.joint_constraints;
Set the dual arm place location. This defines the desired pose of the frame “frame_to_place” in the world_frame. So at the end of the dual arm place the “frame_to_place” will be at loc.place_pose.
loc.place_pose.header.frame_id = world_frame;
setPosePosition(loc.place_pose.pose, 0.7, 0., 1.2);
setPoseRPY(loc.place_pose.pose, M_PIl/2., 0., 0.);
loc.frame_to_place = target_link;
Set the start translation. In some case the part can be in a support (slot) and this starting translation allows to extract the part from this support.
setGripperTranslation(loc.start_place_translation, world_frame, 0.1, 0.05, 0., 0., 1.);
Set the approach.
setGripperTranslation(loc.pre_place_approach, world_frame, 0.1, 0.05, 1., 0., 0.);
Send the request to the dual arm place action server
e = arms.dual_arm_place(obj, std::vector<dual_arm_msgs::DualArmPlaceLocation>(1, loc), trajectories);
Place the bar with both arms and the torso at location 2 and with torso goal constraint
waitUser("To execute place 2");
Since we want to use the torso we need to use the arms_torso and configure it for dual arm motion
arms_torso.setPlanningTime(5.);
arms_torso.setPlannerId("RRTConnectkConfigDualArm");
arms_torso.setDualArmPlanOnly(false);
arms_torso.setDualArmReplan(true);
arms_torso.setDualArmReplanAttempts(3);
arms_torso.setDualArmReplanDelay(10);
Set the dualArmPlaceLocation structure
loc.id = "loc_da_2" + obj;
Set the dual arm place location. This defines the desired pose of the frame “frame_to_place” in the world_frame. So at the end of the dual arm place the “frame_to_place” will be at loc.place_pose.
loc.place_pose.header.frame_id = world_frame;
setPosePosition(loc.place_pose.pose, 0.6, 0., 1.4);
setPoseRPY(loc.place_pose.pose, M_PIl/2., 0., 0.);
loc.frame_to_place = target_link;
Set the start translation. In some case the part can be in a support (slot) and this starting translation allows to extract the part from this support.
setGripperTranslation(loc.start_place_translation, world_frame, 0.1, 0.05, 0., 0., 1.);
Set the approach.
setGripperTranslation(loc.pre_place_approach, world_frame, 0.1, 0.05, 1., 0., 0.);
Specifiy the desired value of the torso for the goal state.
loc.user_goal_constr.joint_constraints.resize(1);
moveit_msgs::JointConstraint& jc = loc.user_goal_constr.joint_constraints[0];
jc.joint_name = torso_jnt_name;
jc.position = max_torso_value;
jc.tolerance_below = 0.1;
jc.tolerance_above = 0.1;
jc.weight = 1.;

e = arms_torso.dual_arm_place(obj, std::vector<dual_arm_msgs::DualArmPlaceLocation>(1, loc), trajectories);
Place the bar with both arms and the torso at locations 3 and 4, without torso goal constraint
Remove the torso goal constraint
loc.user_goal_constr.joint_constraints.clear();

while(1)
{
    waitUser("To execute place 3");
Place location 3
{
    setPosePosition(loc.place_pose.pose, 0.5, 0.4, 1.4);
    setPoseRPY(loc.place_pose.pose, M_PIl/2., 0., M_PIl/5.);

    e = arms_torso.dual_arm_place(obj, std::vector<dual_arm_msgs::DualArmPlaceLocation>(1, loc), trajectories);
}

waitUser("To execute place 4");
Place location 4
    {
        setPosePosition(loc.place_pose.pose, 0.7, 0.2, 1.5);
        setPoseRPY(loc.place_pose.pose, M_PIl/2. + M_PIl/2., 0., 0.);

        e = arms_torso.dual_arm_place(obj, std::vector<dual_arm_msgs::DualArmPlaceLocation>(1, loc), trajectories);
    }
}
That is all. You can change some parameters or defined a new location in this code to see other motions.
The entire code
The entire code can be seen in the moveit_dual_arm_planning_tutorials repository in the moveit_dual_arm_planning_tutorials/doc/pr2_tutorials/dual_arm_pick_place directory.
Declaring the executable
To launch the demo you need to add to the CMakeList.txts of your demo the declaration of your executable, this is the example for this demo
add_executable(dual_arm_pick_place_tutorial src/dual_arm_pick_place_tutorial.cpp)
target_link_libraries(dual_arm_pick_place_tutorial ${catkin_LIBRARIES} ${Boost_LIBRARIES})
install(TARGETS dual_arm_pick_place_tutorial DESTINATION ${CATKIN_PACKAGE_BIN_DESTINATION})
The launch files
The entire launch file is in the moveit_dual_arm_planning_tutorials package For this demo there is two launch files.
- demo.launch will launch the planning_context, the joint and robot state publisher, RViz and move_group with the requied components to use the dual arm capability.
- dual_arm_pick_place_tuto.launch will just launch a node executing the code presented above to pick and place the object with both arms.
Compiling the code
To compile, go to the root of your workspace
catkin config --extend /opt/ros/indigo --cmake-args -DCMAKE_BUILD_TYPE=Release
catkin build
Running the code
Roslaunch the two launch files in two terminals in this order to run the code directly from moveit_dual_arm_planning_tutorials:
roslaunch moveit_dual_arm_planning_tutorials demo.launch
roslaunch moveit_dual_arm_planning_tutorials dual_arm_pick_place_tuto.launch
Don’t forget to source your environement before to roslaunch!
Once it it launched it is required to do in the “Displays” panel (generaly on the left side of the RViz window)
- In “Global Options” select the fixed frame = odom_combined
- If not already here “Add” the “PlanningScene” display and select its planning scene topic = move_group/monitored_planning_scene
Then go back to the second terminal to play the demo by pressing enter at each step.
If the execution failed and it is linked to the moveit fake controller manager plugin you must install the dedicated package: moveit-fake-controller-manager.
Expected Output
In Rviz, we should be able to see the setting of the environment and three trajectories:
The two columns support and a bar on it are added to the planning scene,
The robot picks the bar with the left arm. The approach translation and the postures of the gripper can be observed,
The robot picks the bar with the right arm. The approach translation and the postures of the gripper can be observed,
The robot places the bar at the desired location. The start and approach translations can be observed,